Tuesday, December 27, 2011

Ocean Oct. 2011

We had an amazing time at the beach this year. We went at the end of Oct. and the weather was perfect. The boys loved it and had so much fun. Thanks Mom and Dad for taking us .


1st day of school

Austin started the 5th grade with Mrs. Lee. Braxton started the 1st grade with Mrs. Tilton.

Birthday boys!


So this year we had a 3yr old a 6yr old and an 11yr old. Crazy how old thses guys are getting. Cash and Braxton had their party together they had friends over and made cupcakes.
This is our Cash Money by his tree. They are both so big now!

Austin turned 11 and we celebrated his birthday in Vegas.

Our family and the Benson's went cosmic bowling to celebrate!

You can tell which family gets their picture taken often and i don't even know where Braxty is. Oh well it was a good time, even though Austin looks miserable.

Saturday, November 5, 2011

Happy kicked the crap out of cancer day!

Yesterday was my year mark of being cancer free. On Nov. 4th last year I had my last chemo treatment. I was a hot mess. I had been diagnosed with chorio carcinoma in April of last year I endured 7 months of weekly chemo treatments. By the end I was weak not only physically but mentally and emotionally. Here I am at the end of the treatments
I know scary right I defiantly looked more dead then alive and kinda felt that way too. But I'm blessed cause I'm alive the cancer is gone. A year later I'm healthy, I'm happy, I'm busy. So basically I'm back to me and I love and appreciate everyday that I get to be me. So here a year later I look like this
No longer sickly and with the man I love. With all we've been through this last year we are still the best of friends. It's not always about how beautifully or gracefully you survive life's challenges but it's the fact that you survived and your a better person cause of it. So happy anniversary to me and the fact that I beat cancer to death.

Wednesday, November 2, 2011

New Decor Blog

Ok I finally did I just started a blog for my DIY projects. This one will go back to being my family blog and I will start letting the family know what's going on with my kids. The blog is Beer Budget Decor on Blogspot. I'm excited to start I transfered over some of my project posts sop they are on there already. Any advise On how to get this thing going would be great.

Tuesday, November 1, 2011

Love note pallet wood sign


I've been wanting to make a sign for over my bed using a pallet. I had no idea how hard those suckers were to take apart seriously crazy. I watched youtube videos and got the biggest sledge hammer but in the end I just took a power saw and cut the crap out of it. When I was finished I ended up with this

So I patch worked the pieces together to get the size and shape I wanted. I used plumbers tape which is a metal strip with holes running all down it it comes in a little roll for super cheap I just screwed it all together with that. I wanted a love letter type feel for it so I just used white craft paint and free handed the lyrics on to it. By the way I'm sure this song will be stuck in your head all day cause that's what happens to me. But I love how she turned out. A big statement piece for about $3 dollars since I only had to buy the plumbers tape. Love me some cheap decor. Ok one last look...


Linked to
Todays Creative Blog

Wednesday, September 14, 2011

TP Mirror


This is so my kind of project, it didn't cost me a dime. It is a big statement piece though and you can't beat that. So my supplies for this project are a round mirror that I got for free toilet paper rolls and craft paint. You could use any round mirror they sell them everywhere and I find them at thrift stores all the time.
So I painted the frame of my mirror black and smashed the tp rolls flat and then cut them up to make leaf shapes. I then painted each leaf shape with the black paint. Using my hot glue gun I glued the leaves around the mirror then glued leaves in each space till I got it as round as I wanted. The results are amazing most people think it's metal till I tell them it's TP rolls. So here she is!
I just love her and at zero cost it's really a project anyone can do . Since craft paint comes in like a million colors you can honestly make one to match any room decor.

Linked up to


Monday, May 23, 2011

Super chic for super cheap!

I'm loving getting some projects done. At easter we went to Vegas and I went thrifting and took a trip to micheals. Dangerous combo for a crafter like me but i just love the things I got for the house! For the front room I got a stencil and craft paint and brushes about $15 in supplies but with that I turned this
Into this!

And this is no wall flower either. It's about 3ft wide by 2 1/2 ft tall. It's a big lady but for $15 bucks AAAAMazing! I love her. You don't need much instruction to make your own I had my hubby screw four brackets on the back two hold the threee pieces together. I sanded her down cause I was using crap wood from out by our shed that's been there for who knows how long. I painted her white with craft paint. made a heart stencil. Like so...
Then I Painted on the red heart. I used my letter stencil! ( which I still have and is available to borrow anytime) And done! So easy! My inspiration is the Susie Harris Blog she does all these amazing hand painted signs! I decided to brave it on my own and i'm so glad i did.

So cute I feel like she needs a little something on the sides of her but it'll just have to wait.

Next I got a crazy chicken head and these sconces at Savers total it was $10 for the lot not super cheap but still a good deal.

See super ugly and plastic I didn't want sconces and have to put in candles so I just did this..

Kinda wacky but I love it for that reason. No one else will have a wall quite like this one.

Ok for my final project which I love love love! I got a lamp at the D.I. in St. George for $7. Her shade was a little tall but with some tape and wire clippers I was able to shorten it and with fabric I already had I made her look like this...

I got the idea from this blog I did mine a little different cause I wanted to use the materials I already had to cut costs. But I just love it!
All I did was hot glue fabric all over the shade. Then I cut strips of faabric folded in half ironed then hot glued on in a wavy pattern. It was a bit time consuming but so worth it I think. So there are my latest bargins don't be afraid to try them yourselves I have no skills what so ever so if i can do them you can too!

Sunday, April 17, 2011

Dirty hamper turned awesome end table!

So how do I know who my real friends are? They're the ones that skip the cookies and bring me over crap from their Grandma's house that she was going to throw away. The absolute perfect gift for me!
And that's just what my beautiful friend Rachel did for me when she brought me over her Grandma's dirty clothes hamper. She's plastic and a hamper but that didn't stop me from turning her into this amazing end table for my hallway.
Don't you love how the glaze brings out all the little details.
She's the perfect size for this spot now I need to find the right accessories for her!

Mirror and sconce update!

So gross right. This mirror has been in our basement storage for years it's a little jacked so my hubby would not let me hang it in our house. But I thought it would be perfect for the downstairs guest room where he never goes. Cleaned off the dust and dirt a little spray paint and so pretty!

I love how it looks and brings more light into this basement room.

I'm getting there I just love how this room is coming together so cheery and bright you don't know your staying under ground.

Awesome Orange dresser for spring!


Ok don't you just love this before pic! The unfinished dirty basement with the drawers all askew. It makes it look like an amazing hot mess, which will make the after pics that much more amazing! Are you ready? TADA!
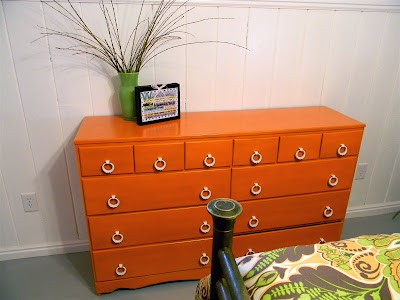
Isn't she pretty, and so perfect for spring. It just makes me happy inside to see these bright colors.
Don't you just love this hardware. It wasn't this pretty when I got it. It was all green and peach and brown but I got them on ebay for $15 dollars for 24 and that included shipping. They are huge and solid I love them. The perfect earrings for this dresser!

Linked to
Furniture Feature Fridays

Tuesday, April 5, 2011

The Ladder is finally complete


I've had this project going forever. I'm so happy I finally got it done. My good friend has been building her dream home and if you've built a home you know how stressful it is. So I decided to make her a little house warming gift. It has taken me a long time to complete but I love how it turned out. I don't have a total before cause I forgot. But this is her after she was primed.
It took me forever to find the paint it's Krylon Blue Ocean Breeze. I used a little glaze in black. And then I staped the rope to each rung. This ladder was actually from an outdoor playset that we tore down a few years ago it's been on the side of our house forever. But I saw this done on a blog so I decided it was too cute and copied it. I tried really hard to find the blog post again to give them credit but after three days of trying I gave up. But here she is I just love how it turned out.

If you want to copy my time out sign. That post is HERE
The other pins can be used for hanging pictures or anything you like!

Super cheap wall art


So I found this toilet paper project on this blog and knew I wanted to do it for my bathroom. I'm mean how perfect is tp wall art for the john right! So this is the site Bon Temps Beignet

Anyway i couldn't get mine to work out quite as cute. Then i had this genious idea I had just trimmed my willow tree and had saved all these branches so put the two together and this is what I came up with.

I loved how it turned out and since I had everything on hand it didn't cost me a dime

Friday, April 1, 2011

A year ago today.

A year ago today I got a call that you never think you will ever get. I'm sorry but your biopsy results came back and you have cancer. I wanted to say is this a joke it was after all April fools but I knew this was no joke. Can you imagine having to call your family on April Fools to tell them you have cancer. Everybody was saying is this a joke? But even i was in deep denial. I had been told by my family doc that even if it's cancer they just give you a chemo pill to take and that people sometimes take it daily for arthritis so it wasn't that big of a deal. So we told everybody it wasn't real cancer it was going to be fine. I had no idea what i was in for in the next seven months. It was defiantly real cancer and real chemo. This last year i have learned so much about myself. I'm not as tough and indestructible as I had always thought. I do need help and can't do everything on my own. I learned I could pray and ask for help with anything including poop! I learned that trials including sickness is not a punishment from God or a tool he uses to teach us things but it's a natural consequence of these imperfect bodies. Sickness just happens it's a part of life so don't take it personally. I learned just how much my husband loves me and how much I can lean on him and depend on him. I'm grateful to my mom who stepped in and turned in her grandma badge for a mom badge and helped take care of me and my kids. I'm also so grateful for our community who stepped up with not only emotional support but financial help as well without every one's generosity we would have lost everything our home and sanity. It made me so grateful for my healthy kids. That was one thing that really helped me get thorough it all was the thought better me then my kids. A year ago today I was clueless now I know more things than a woman my age should. I can't say that I'm grateful for cancer but I can say that I'm grateful for the things I have learned and the people who have taught me. I hope this year brings more learning experiences but through another way besides cancer.

This pic is from my last day of chemo.

Friday, March 4, 2011

Basketball Boys

Austin and Ryan were both on teams this year. It was so fun to watch them play. Austin really improved this year.


- Posted using BlogPress from my iPad